Create Drawing Release
Overview: A Drawing Release is a release of material to the field based upon quantities specified in CMMS created electronic drawings.
Process:
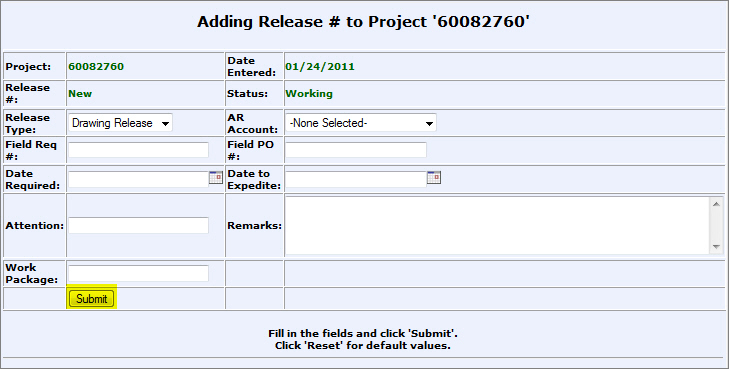
Create a Drawing Release Header
From the CMMS Menu > Releasing > Material Release > New Material Release.
Enter data:
Release Type: Drawing Release
AR Account: Identifies the account the material will be billed to.
Field Req #: (Field Requisition Number) an alpha/numeric number given by a customer to identify the specific order.
Field PO #: Field Purchase Order Number.
Date Required: Date material is required by.
Date to Expedite: Date to take action on the procurement of material to insure it is available when required.
Attention: The person who will receive the material or who the material is intended for.
Remarks: Enter any additional remarks such as delivery instructions.
Work Package:System or work package number.
Click Submit.
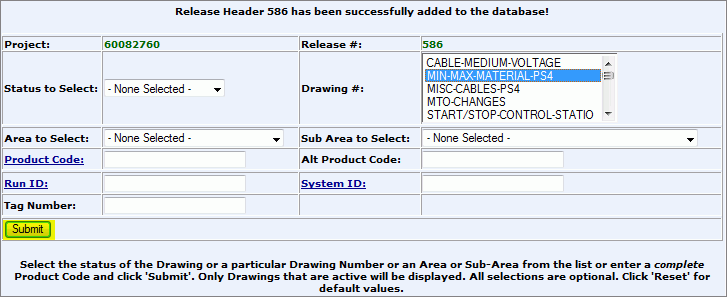
Status to Select: the status of the drawings)
Drawing #: select one or more drawings) to release. (to select more than one drawing: hold ctrl key down and click on the drawings)
Area to Select: (only if estimated drawing MTO is loaded)
Sub Area to Select: (only if estimated drawing MTO is loaded)
Product Code: unique number that identifies material in the project product catalog.
Alt Product Code: optional number used as an alternative product code
Run ID: code used to identify cable, cable tray, or conduit run
System ID: code in Drawing Header that identifies a particular system
Tag Number: Customer defined label.
*Leave all fields blank to see all drawings.
Click Submit.
A list of all Drawing Headers within the search criteria will populate.
*You will only be able to select drawings for release if the Drawing Header's MTO status is Complete or Pending.
*If you click on the Drawing Number hyperlink a list of all items on the Drawing Header will display.
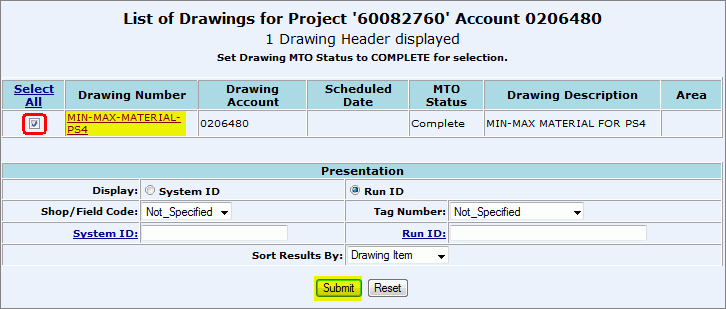
Click the "Select All" check box for the drawing(s) to release material from.
Fill out any search criteria in the "Presentation" fields (narrows the search results for a particular item to release):
System ID (radio button): identifies a particular system to search by
Shop/Field Code: Not Specified, Field, or Shop
System ID (hyperlink): impute System ID code
Run ID (radio button): search by code used to identify cable, cable tray, or conduit run
Tag Number: customer defined label.
Run ID (hyperlink): impute Run ID code
Sort Results By: Drawing Item, Product Code, or Drawing Number
Click Submit.
Add items to the Drawing Release:
 Click Here to Learn How to Read
the Search Results
Click Here to Learn How to Read
the Search Results
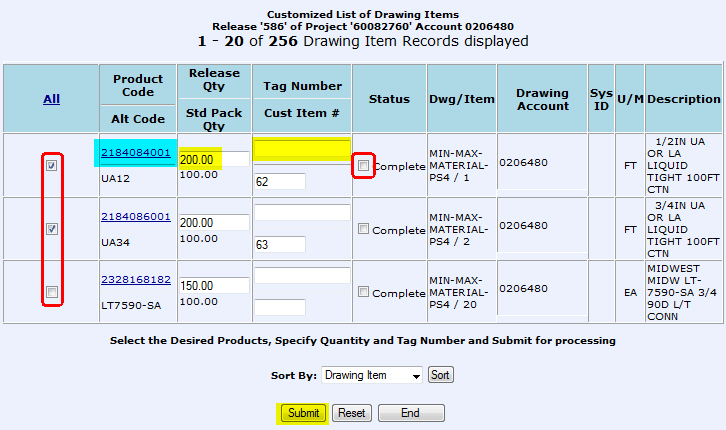
Select the check box of one or more items to release. (to select all items: click the "All" column title hyperlink)
Change the "Release Qty" to the number of items you want to release. The number already in the column is the number still needed for the drawing.
Add a Tag Number if needed
Only check the "Status" Complete check box if this item is no longer needed on the drawing. This function will zero out the "Release Qty" column and make sure that the item(s) will no longer be purchased for this drawing.
Click:
Submit: adds material selected on screen to release, will bring you back to the same screen to add more items.
Reset: Clears entered data and return screen to default.
Last click:
End: used when you are done adding items to be released.
*Click on the Product Code hyperlink to view the Project Catalog Drawing Estimate Report.
A confirmation pop-up will appear, click OK.
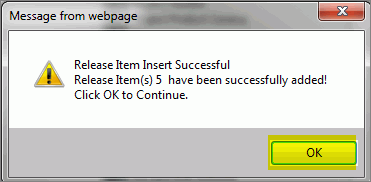
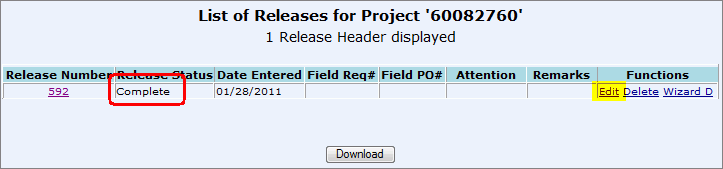
A list of the newly created Release will appear.
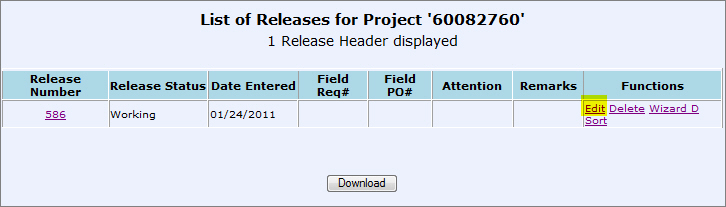
Click Edit in the "Function" Column.
From the Edit screen, change the "Active" field drop-down box to Complete.
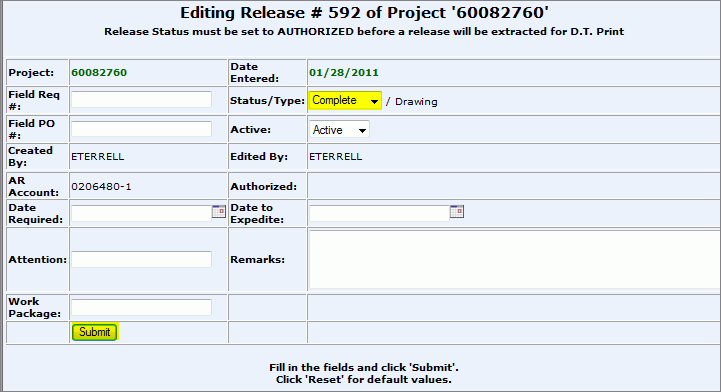
Click Submit.
Click OK in the Successful pop-up.
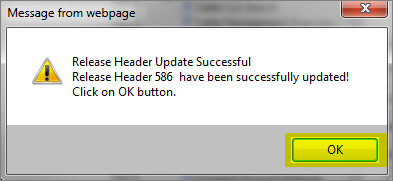
The newly created release should state a "Release Status" of "Complete."
Dependent upon job role: Click Edit in the "Function" Column to authorize release.
From the Edit screen, change the "Active" field drop-down box to Authorized.
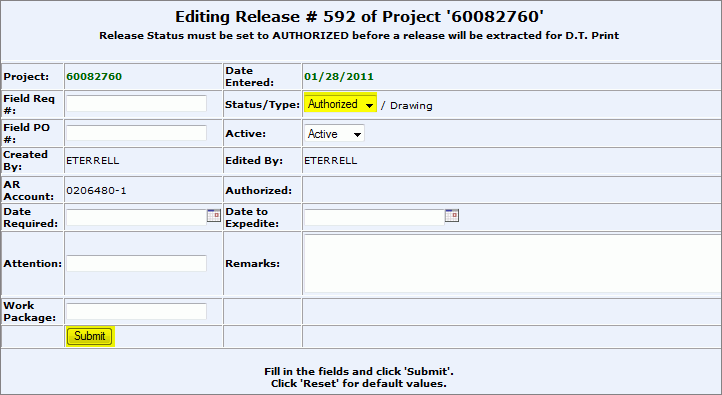
Click OK in the Successful pop-up.
The newly created release should state a "Release Status" of "Authorized."

